Hi Readers!
In yesterday’s lesson in science we extracted DNA from ripe Bananas. We’ve been focusing on Biology for the past term; we learned about the parts (phosphate, sugar, nitrogen bases, etc) of DNA, how the amount of chromosome pairs affect a person, the karyotypes, how important it is and what DNA is — including the specific parts and much more.
Today we were assigned a blog post to explain what we did. We needed to describe the steps and what we did. After we did so, on a doc we did a summary made from the teacher. It was fun to experiment and learn about DNA. Enjoy reading!
Method
Equipment
- Funnel
- Zip lock Bag
- Skewer Stick
- Cloth (Big enough to cover the funnel)
- Test Tube
- Beaker
Ingredients
- Ripe or Unripe Banana
- Ethanol
- Dish Washing Liquid
- Water
- Sodium (salt)
Instructions:
- Tie your hair
- Make sure your environment is safe to experiment in
- Get all the equipment required
- Peel the banana
- Break the Banana into quarters
- Place one quarter of the banana into the plastic zip lock
- Sprinkle 1 pinch of salt
- Add 1/2 cup of water into the mixture
- Mush the mixture; until there’s no clumps or big pieces of banana
- Collect the beaker, test tube, cloth and funnel
- Place the test tube into the beaker
- Put the funnel with the cloth into the test tube
- Carefully pour the extract into funnel
- Using this method is called filtering
- Make sure to go through this process slowly
- When it’s all filtered, remove the funnel and cloth (make sure to thoroughly wash both)
- After all the banana is strained take the test tube out
- Pour warm water into the beaker (about 3/4 full)
- Once the water is poured put the test tube back
- Add dish washing liquid (5ml) into the test tube
- Mix this with the skewer (make sure to leave this in the test tube. But make sure it’s easy to grab after.)
- Leave this for 10 minutes
- Later when 10 minutes have passed, take the test tube out of the beaker (The mix should look slightly clearer than before)
- Slightly tilt the test tube on it’s side ( 45°)
- Pour no more than 3ml of ethanol into the test tube; be careful when doing so
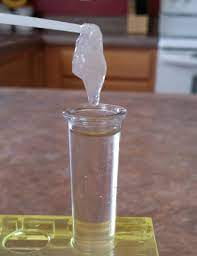
- Patiently wait for the white, clump, stringy like strands to appear at the surface of the test tube
- Using the stick, pull the DNA (stringy strands) up
- Place them/it on a piece of paper towel
- All Done!! You successfully extracted Banana DNA 😮
Summary
This was a very fun practical/experiment to do (I wasn’t there for the whole time but from what I heard, this is what I think). I learnt interesting methods along the way; including that bananas have their own DNA. Next time I want to engage more.
Why did we add salt and detergent to the banana mix? Would it have worked if we didn’t add them? Why?
Salt is an important factor in extracting DNA. It’s job is to help bring the DNA jointly. If we hadn’t done so, it would’ve been more challenging and the banana molecules would’ve likely dissolved into the water. Detergent assists the cell membranes; shatters it down and allows the DNA to show. To be more specific, dish washing liquid divides the lipids (fats) and proteins that make up the membranes bordering the cell and nucleus. Together they are very salient.
Without these it’s very difficult to go through with this experiment. The outcome will most likely, not turn out well. I certainly advocate you to use these two ingredients; salt and detergent.
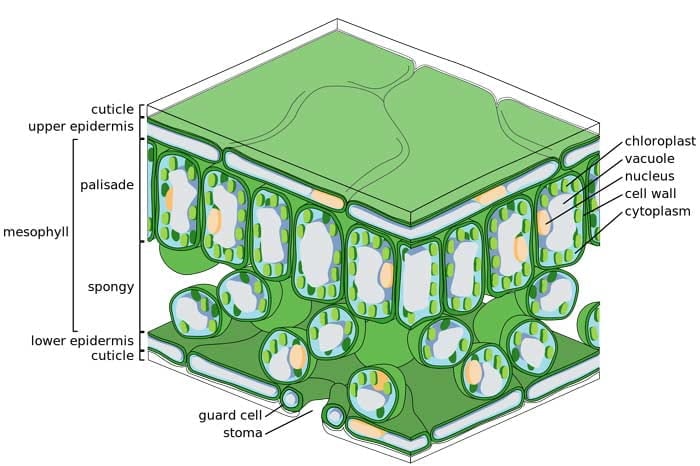
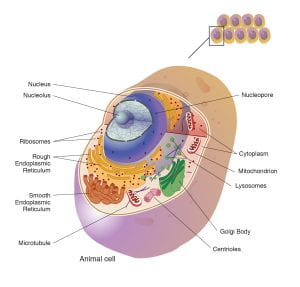
Here’s 2 pictures of a cell:
Banana Cell (Parenchyma Cell) ↓
Human Cell (Cella) ↓
Video Tutorial
Website Instructions
OxfordOwl ← Link
Images of Equipment
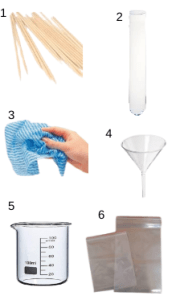
1 = Skewers
2 = Test Tube
3 = Cloth
4 = Funnel
5 = Beaker
6 = Zip lock Bags
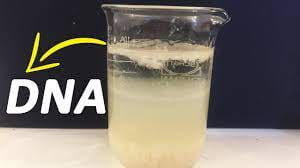
Images of Extracted Banana DNA:
Thank you for reading 😊!!