Category: Ako | Learn

Investigating State Changes

Hi guys!

Last Friday in science we did an experiment about ice. We got into groups and had to record data. Here is what we did:

Aim: To observe water as it changes state from solid to liquid then to a gas.

Equipment/Ingredients

  • 250ml beaker
  • Thermometer
  • Hot plate
  • Heat mat
  • Stop watch
  • retort stand
  • Clamp
  • Ice Cube
  • Paper/pencil or pen

Method

Instructions

  1. Get all ingredients and equipment required.
  2. Set up the resort stand with the clamp, thermometer, and heat plate.
  3. Collect enough ice so that your beaker is half full, add the ice into the beaker.
  4. Write down the temperature on the piece of paper.
  5.  Turn on the heat plate and start the timer.
  6. Once a minute hits check the temperature and write it down onto the piece of paper with the minute.
  7. Continue this for every minute until it starts boiling for 2-3 minutes.
  8. Turn off the heat plate and put the beaker onto the heat mat.
  9. Once the beaker has cooled down put all the equipment away.
  10. All done!

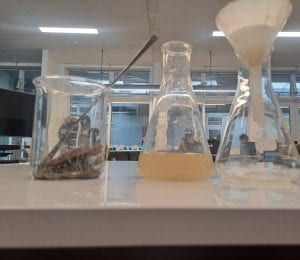
Here’s a photo of the set up:

Here’s the data:

Time Temp
0 -3
1 -2
2 -2
3 -2
4 12
5 25
6 23
7 20
8 20
9 27
10 40
11 55
12 66
13 75
14 82
15 87
16 90
17 93
18 98
19 99
20 100
21 100
22 100
23 100

Conclusion

The experiment worked out well. My team didn’t get to the point of boiling but it was close, but other peoples experiments worked.

The Bloody Code

Hey Guys!

Recently in social studies we started to learn about the bloody code. We learnt about the punishments people got for committing crimes. (The punishments back then were very harsh). For today we answered questions about it.

Questions & Answers

Why was the legal system so harsh?

The rich men made the laws they only made laws to protect themselves (the laws were mostly strict on the poor and kept them poor).  They thought people who committed crimes were lazy and selfish. To stop people committing crimes they believed death penalty would be the best solution.

What are public executions?

Public executions are when criminals are hung by their hands in front of the crown court. The people who organized this thought hanging criminals in public would scare and stop people from committing crimes. People even tried to go on balconies to get better views. Some crimes you can be hung for are murdering and stealing.

How well did it work?

Both of these didn’t work well; people were still committing crimes.

Thanks for reading  🤗

Mixture Challenge

Hey Guys!

Today in science we got set to do a mixture challenge. Our teacher put some steps on board that we could do. He then told us ingredients in the mixture; water, sand, bits of bark. We had to think of a plan in a team to get all the ingredients in separate containers.

Our plan

  1. Strain to get the bark out of the mixture.
  2.  Filter the mixture to get the sand.
  3. Condense to get the water back.

Method

Ingredients

  • Bark
  • Sand
  • Water

Equipment

  • Beaker
  • Filter paper
  • Spatula
  • Conical flasks (2)
  • Funnel
  • Paper

Instructions

  1.  Get all equipment and ingredients required.
  2. Take the beaker with the mixture in it.
  3. Tip the beaker and slowly pour into the conical flask (make sure to hold the spatula onto the beaker while doing so).
  4. While pouring the mixture keep the big pieces from the mixture.
  5. Fold the filter paper into an ice cream cone.
  6. Add the funnel to the other conical flask.
  7. Then add the paper into the funnel.
  8. Pour the liquid into the funnel and wait for the liquid to drip all out.
  9. Once all the water has dripped into the conical flask the experiment is all done.

Here is a photo of the stuff in seperate beakers:

Conclusion

The experiment worked; all the steps and result. In the end we did get the clear water and other ingredients in seperate beakers/conical flasks.

Bean in a Beaker

Hey Readers!

In science we did a experiment of a bean in a beaker. We added the bean to a beaker with water and paper towels. Over multiple weeks we took photos and watched it grow. We got into pairs and watered the plant every time we had science. I worked with my friend Venice, here’s how our plant went:

Aim: To observe an record germination of a bean seed.

Method

Equipment:

  • 250ml beaker
  •  About 3 pieces of paper towels
  • Water
  • Bean seed

Instructions:

  1. Get all equipment required.
  2. Wet your paper towels so that they are damp but not too wet.
  3. Add your bean to the beaker making sure it isn’t drowning and not too high.
  4. Make sure to add water to the paper every day so that your plant doesn’t dry out.
  5. Don’t forget to take photos every week.
  6. All done!

Here is what the bean looks like in the beaker:


Here is day 1:

On day 1 the bean is in the correct place and the paper towels are damp enough for the bean to begin its cycle to become a plant.

Week 1:

During week 1  I started seen the bean sprout which means it’s starting to grow!

Week 2:

At week 2 the plant started becoming more of a plant.

Week 3:

Between week 2 and 3 the size change was humongous; I was shocked when I saw how much it grew in one week.

Week 4

(Don’t mind the bad pic)  At week 4 the bean plant started to droop down, hopefully it will stand up straight again.

Week 5

At week five it started to stand up again.

Week 6

At week 6 nothing really changed, it just stood up a bit more.

Week 7

During week 6 to 7 the plant started to stand up again and look more healthier.

Conclusion

The plant grew good throughout all the weeks. At week 4 it went a bit down but it ended up getting up again. For the last two weeks (week 6 and 7) I saw great progress as well. To make it better for next time I would try to make it stand up a bit more.

Thanks for reading!

Hauora

Hey Readers!

For health we had to do a blog post about what we have been learning about for this unit.  Currently we have be learning about 4 walls of hauora; the meanings of each area and how to help areas that have fallen down. A activity we did was make a house/whare on Tinkercad including all the 4 areas, it was actually quiet easy to create. As well as playing some fun games/challenges such as building a marshmallow tower and paper scissors rock.

Firstly I will be explaining Te Whare Tapa Wha (it’s basically 4 walls of a whare that represent health). The names are:  Taha Whanau – social, Taha Hinegaro – mental and emotional, Taha Wairua – spiritual and Taha Tinana – physical.

Ways you can take care of  your hauora and others are talk about their feelings and struggles (mental and emotional),  hanging out with friends at the mall (social), spending time admiring nature (spiritual), going on a walk (physical).

To be assertive you need to be able to speak up for yourself and being confident even in the smallest things such as telling someone you feel uncomfortable. Steps to being assertive: say “NO,” give a reason, acknowledge the persons feelings, suggest a alternative and if they keep begging you walk away.

An example of when you can need to be assertive is when a friend wants to skip last period (at school) but you don’t want to because you have a test. You start off by saying “NO! I don’t want to skip class because I have a test, I know you feel a bit drained from school but I need to pass my test, I think you should just go to your next class because it’s the last period and it will go fast anyways.” While being assertive make sure you make eye contact, use the I statements, stand up/sit up straight, have your hands by your side and don’t fidget.

It’s important to take care of all areas of hauora because if you don’t it can affect your wellbeing and might cause extreme bad issues to you. When all areas of your health are good that makes you even more happier with relationships and everyday life and if one area is down it affects all of  Te Whare Tapa Wha.

Here is my house I made on Tinkercad:

Thanks for reading, I hope you enjoyed my blog post  😊

Rice Paper Rolls

Hey Readers!

Today in home economics we learned how to make a easy rice paper roll. We started off by getting all of our equipment, cut our vegetables, then made the rice paper soft in order to wrap everything all up.

Here is how to make it:

Equipment

  • Knife
  • Vegetable peeler
  • 1 green board
  • 1 white board
  • Plates (1 for the vegetables and the amount you need for every person).

Ingredients

  • Rice paper
  • Mint
  • Carrot
  • Cucumber
  • Capsicum
  • Beansprouts
  • Any other vegetables/ingredients  you want to add
  • Chilli sauce/any sauces

Instructions

  1. Get all equipment required
  2. Wash your vegetables
  3. Cut up your vegetables into julienne strips (thin slices)
  4. Soften your rice paper by dipping it into warm water
  5. Add ingredients onto your rice paper
  6. Wrap your rice paper up (wrap the end part then sides)
  7. Enjoy!

Heres a picture similar to what we made:

Conclusion

In my opinion I think the rice paper rolls were ok. The texture was chewy and crunchy. The vegetables were a bit bland for me because they didn’t have any seasonings in the rolls. The chilli sauce made it have some more flavour. Next  time I will include some beef.

Thanks for reading!

Digital Storytelling

Hey Readers!

In this blog post I include stuff I learned in social science, I hope you enjoy reading it.

Causes and Effects of Agriculture

In this piece I am going to be explaining the neolithic revolution and how agriculture has become so important for humans. There are disadvantages and advantages to agriculture which I will also discuss.

One reason for large scale agriculture during the neolithic revolution 9000 years ago was population increase, this has meant more people need food, for example there are now about 8 billion people in the world, compared to 1.6 million in 1900. Another reason for the revolution is the growth of the cities. As well as that agriculture everyone gets food which helps build society.

One advantage of agriculture is food supply this is good because people need food, therefore this will mean more people are fed . One disadvantage of agriculture is ‘it’s hard’ this is bad because not many people will want to work therefore, this will mean no food. Another disadvantage of agriculture is deforestation, (chopping down trees)  there are multiple reasons to this; destroys habitat which makes animals extinct,  adds CO2  (carbon dioxide) to the air, causes global warming, increases sea level and creates flooding.

Now we are learning about Sumerian gods. Anu is one of many gods and goddesses the Sumerians believed in.

Here is the poster I made about him:

We also had to make another profile/poster about a Sumerian god that rules a city. There were multiple options and I chose to do mine about Larak; the god for Larak is Sabilsag.

Here is the profile about Sabilsag:

MRS. C. GREN

Hey Readers!
This week in science we learnt about MRS.C.GREN, every letter has a meaning. They all relate to  the things you need to have to be a living/the 8 criterias all living things must have; like humans. For this lesson we have to explain the meanings of each letter.

M stands for move; being able to move.  R stands for respiration, the need for oxygen to survive.  S stands for sensitivity, being able to feel pain and all of the senses. C stands for cells; being made out of cells.  G stands for growth, to be able to get taller and bigger. R stands for reproduction, to be able to make babies for example chickens laying chicks. E stands for excretion – to be able to use energy while working.  N stands for nutrition, the need to eat food.

Thanks for reading

Julian Dennison

Hey Readers!

Today with Miss Alpers we read a story about Julian Denison. We had to answer questions and write a blog post about it. This time I have to talk about Julian Denison.

Firstly Julian Denison grew up in Lower Hutt. He lived with a family that didn’t have a lot – his parents worked very hard. Half of his young life he was in the film business. In 2016 he starred in Hunt for the Wilderpeople at age 13. As he grew older he was in more movies with different people such as Millie Bobby Brown. 

Here’s a picture of him:

Thank you for reading my blog post!

Christmas Tree Origami 🎄

Hello Readers!

Today with Miss Alpers we got to create origami Christmas trees. We were given a piece of square paper and watched a tutorial to create it. In this blog post we have to explain how to make it.

Firstly you get a piece of square paper, you fold it multiple ways and fold it even more. After you finish folding up to a certain point you need to cut four times. Then you fold even more. Sorry if this explanation is not the best.

Here is the link to the video of instructions:

Thanks for reading my post 😀