Category: Ako | Learn

Science – Parachutes 🪂

Kia Ora Readers!

Two weeks ago we we made parachutes. I worked with my friend Venice. Firstly we cut out the shape with a plate (It was the easiest way of making a circle). We used string to make the parachute fly higher. Tape was used quiet a lot to add details. Some people cut a hole into the parachute to make it fly slower, it didn’t work out for us. The main part of the bag was a plastic bag.

Aim: I want to make a parachute that can fly and take a long time to touch the ground.

Equipment:

  • Tape
  • Plastic bag
  • String
  • Scissors
  • Ruler

Instructions:

  1. Get all equipment required.
  2. Cut out the circle.
  3. Cut string and tape.
  4. Make even distances and add string with tape (The string needs to be 30cm).
  5. Add weight to the end of the string ( For example “paper clips”).

Discussion:

Venice and I did a great parachute. We added some extra details to make it “pop”.  It took a good amount of time to touch the ground. My favourite part was adding details. It was very easy and successful.

Here is a video me and Venice took:

Thank you for reading 🙂
Science – Bridges 🌉

Hello Readers!

Last week in science my class learnt about the science behind bridges. We worked in pairs to find the best solution to making a bridge that can balance weight. The goal was to make it strong and stable. We got given some paper, tape and scissors. I wasn’t there for the making of the bridges. But, I did get to see the results of balancing the bridges.

Aim: I want to find out what a bridge needs to support weight and what type of structure is best.

Equipment:

  • Paper
  • Sello/cellotape
  • Scissors

Instructions:

  1. Get all equipment required.
  2. Make a design for your bridge.
  3. Create your bridge.
  4. Test your bridge.
  5. Find out what went wrong.

Here are the class results:

NO.     Bridge Makers Mass Position
1 Christina and Bailee 2 4th
2 Michael and Marvin 9 1st
3 Venice and Vielle 3 3rd
4 Divine and Kristhel 7 2nd

Discussion:

The strongest bridge had stuffing inside to make it stable. The weakest bridge was flimsy and the paper wasn’t properly used to form a bridge. Every bridge was sort of unique. We used thick batteries to add weight to every bridge.

Thank you for reading my blog, have a great day 😁


Drama – Emotional Scripts 🎭 📝

Hello Readers!

In drama we’ve been reading scripts. We started off by listening to a story and making a brain storm about what the characters are feeling about every other character. Every group got to choose one character to work on. The next day we got to work in pairs/threes. We had to choose 1 script to do and perform. The two scripts were called “risk management” and “drinks on the house.”

I went with my twos friends Venice and Kristhel. At first we were going to do “drinks in the house” but then we changed we changed to “risk managent.” After we finished rehearsing our roles, we performance in front of the class. At first I was very nervous, but I just imagined nobody was looking. I played the narrator, Venice played Pike and Kristhel played scratch. The easiest part was doing the brain storm and the hardest part was performing and being confident.

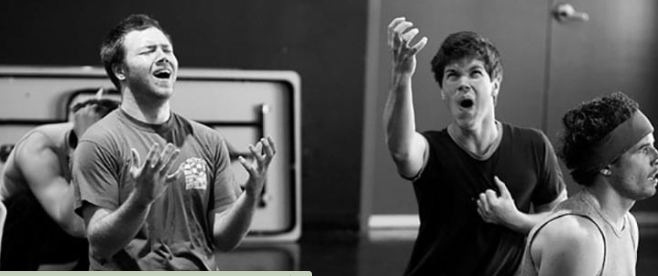
Here is a image of emotional acting I found on google :

Thank you for reading my blog post 😉

Paper Planes

Salaam Readers!

Today in science we did a experiment on paper planes. We watched videos on YouTube. I hope you enjoy reading my blogpost.

Equipment:

  • Paper
  • Scissors

Instructions:

  1. Get all equipment required
  2. Watch a video of a paper air plane tutorial
  3. Fold the paper to make the air plane
  4. Test out the flying distance

Discussion:

I became pairs with Deija-Mae to test out the flying distance. My planes didn’t turn out well.  The normal plane didn’t fly far; it came back and hit other people. I made two paper planes; a  small White Dove and a normal paper plane. The hardest part was flying the plane.  We also had a class flying competition; the fastest persons plane was Devaani.

Here are the videos I used to make the paper planes:

Thank you for reading my blog post ( ͡ᵔ ͜ʖ ͡ᵔ)

Taste Experiment! 😋🍬

Kia Ora Readers!

Today in Science we got to work in pairs. We had to guess the flavour of 6 different lollies. The colours were red, peach, green, purple and yellow. I hope you enjoy reading.

Aim:

I want to figure out if the colours change what the flavours are.

Equipment:

  • Lollies
  • A pair

Instructions:

  1. Get all equipment
  2. Your pair will give you each lollie
  3. Taste the lollie
  4. Guess flavour
  5. Add results


Here is my results:

Colour Correct Incorrect
Yellow Lemon Lime 
Pink Peach    ✔️
Red Strawberry ✔️
Purple Grape  Lime 
Green Purple
Orange Orange ✔️

Here is the class results:

Colour Correct Incorrect
Yellow 18 3
pink 20 1
Red 20 1
purple 16 6
green 8 7
orange 19 2

Conclusion:

I got three out of  6 lollies correct. Some of the flavours got confusing; the easiest colour I got was peach, because it has a distinct flavour. The easiest part was eating the lollies. The hardest part was guessing the correct flavours.

Can you tell the colour of the lollie without seeing the colour?

Yes, you can mostly tell the colour of the lollie without seeing the colour.


I hope you enjoyed reading my post 🙂


Science – Flying Helicopter

Hello Readers!

Today in science we flew a paper helicopter and timed how long it took the helicopter to land onto the ground. As it flew down it spinned the whole way down. The easiest part was cutting it out and timing. I worked with Venice.

Method:

We are figuring out how long it takes for a paper helicopter to touch the ground.

Equipment:

  • Scissors
  • Paper helicopter template

Instructions:

  1. Get all equipment required
  2. Cut out the template
  3. Fold along the dotted line

Discussion:

The longest time it took for it to touch the ground 2 seconds and 30 milliseconds. It went well for me and Venice. The only thing that was tricky was starting the stopwatch at the correct time.

Here is a image of the helicopter:

Drama – F.A.R.T.S.

Namaste!

This week in drama we have been learning about the f.a.r.t.s. and a new drama game. The game we learnt how to play is called vampire. The game is similar to spot light, but has a few different rules. Here are the rules: the lights are off,  everybody has to close their eyes even the vampire, if you get squished on the arm you have to scream and form a wall, the last player standing wins. The different players: Vampire; the vampires job is to “kill” everybody and has to have their eyes closed. Players; the players have to try and not get killed. The game is very tense and has quite a lot of action.

F.a.r.t.s. meaning:

F= Focus; the audience focuses on what the characters are doing.

A= Action; action is just like action movies, their is lots of things that happen and it’s interesting.

R= Role; the character your playing and what your doing.

T= Tense/tension; when a challenging drama game is hard it is “tense.”

S= Space; whats around you on and where you need to move to.

I hope you enjoyed my blog post, feel free to comment.

Science – Heating Water

Kia Ora!

Today in Science with Mrs Wheeler we learnt how to boil water with a bunsen burner. We got into groups or pairs and lit the bunsen burner. We used a measuring stick to check the temperature every 1 to 5 minutes. I was with my friend Venice and a class mate Georgia. Our temperature only got to 65 but most people got to 100. This was because or bunsen burner was small. The easiest part was checking the temperature.

Do you know how to boil water with a bunsen burner?

Aim: I want to learn how to measure the temperature of boiling water.

Method:

Equipment:

  • Safety Glasses
  • Bunsen Burner
  • Gauze Mat
  • Tripod
  • Beaker
  • Mat

Instructions:

  1. Take of any accessories and jackets (Roll up long selves).
  2. Put on Safety Glasses
  3. Set up Bunsen Burner
  4. Put 200ml of water into the beaker
  5. Check the temperature
  6. Light Bunsen Burner
  7. Check the temperature at 1, 2, 3, 4 and 5 minutes

Time and temperatures:

Time (minutes) Temperature
0 20
1 25
2 30
3 35
4 40
5 43

Feel free to comment.

How To Light A Bunsen Burner

Kia Ora Readers!

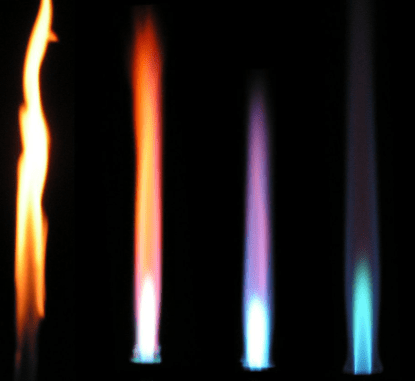
Today in science with Mrs Wheeler we learnt how to light a bunsen burner. We firstly learnt about the different flames. Safety flame, blue flame and purple flame. For me it was just like last year (Very scary at first). The hardest thing was lighting the match.

Fun facts: Robert Bunsen created the bunsen burner and the blue flame is the hottest flame.

Aim: I want to find out how to light a bunsen burner.

Equipment

  • Bunsen Burner
  • Mat
  • Matches
  • Safety Glasses

Instructions:

  1. Get  all of the equipment
  2. Put safety glasses on ( tie hair up, if long and take off any accessory or jackets).
  3. Connect the hose to the gas tap.
  4. Turn the collar to close the air hole.
  5. Place safety mat under neath Bunsen burner.
  6. Light your lighter/match over the Bunsen burner, and then turn gas on ( make sure your arm isn’t over the Bunsen burner).
  7. If finished with the fire turn gas off.


How to make colour of flame:

Blue/Roaring flame= Air hole open

Saftey flame= Air hole closed

Purple flame= Air hole open and add Potassium Chloride


Task:

  1. Close the air hole
  2. Connect the gas tube to the gas tap
  3. Light the gas
  4. Close the air hole


Colours of each flame:

  • Safety flame= Orange/yellow
  • Blue flame= Blue
  • Purple flame= Purple


Here is a image of some coloured flames and a bunsen burner:


Here is a video of me and Venice lighting a Bunsen burner :

IMG_2022

Goal Setting (Term 1)

Salam (Greetings) Readers!!!

This term I have set multiple goals for the year and term 1.  In wananga we had to watch a video about smart goals. Smart goals have to be specific, measurable, attainable, relevant and time based. We had to list our subjects we have this term and what our strongest subjects are.  I thought hard about what I wanted to achieve. It took me about two days to finish this and I think I’m happy with my goals now. I hope you enjoy seeing my goals and feel free to comment.

Here are my goals:

Term 1 Year 7/8 Wānanga Goal Setting

Name: Jordan Officer Class:  MtM Term: 1
Greatest achievement from last year: 
My best achievements from last year was… being first in science for my year group (Year 7) and earning a trophy for having a positive attitude. 
Subjects taken this term:
Hurumanu:
1 Maths
2 Literacy 
3 Drama
Technology: Wood Tech
Language: Maori & Japanese
Other: Wananga, p.e & friday sport.
What are my learning strengths What are my learning work ons
  • Writing long stories
  • Reading 
  • Science 
  • Blogging very informative blogs or blurbs.
  • Making my learning creative.
  • Maths
  • Talking to new people
  • Working with people I don’t normally work with. 
Academic Goals – Using both the Graduate Profile and the Key Competences write down 2 short term goals you think are relevant to you for this term and then think of ones you could work on for the whole year.
1 This term I would like to work on…..

Asking more questions about my learning when I’m not sure what to do or what something means. 

2 My second goal this term is to……..

Memorise the right hand notes for piano. To understand piano more and play without having to think about the notes. By the end of the term.

Long Term (whole year):
By the end of  the year I would like to have seen…….

Me being able to memorise both left and right hand notes for piano. To be more confident in playing songs etc as well as having a stronger pinky. 

Non-academic goal (can be out of school):
Have a better attitude and believe in myself when I feel like giving up. So I can be more confident in trying new skills and activities. 
What will my next steps be?
          For piano goal:                  

  • Practise piano at home
  • Work on every single note 
  • Try to read the notes
  • Try my hardest to achieve this goal
  • Persist when things get hard


      For Attitude goal:

  • Give things my all
  • Say “I can do it” 
  • Try new activities
  • Don’t be afraid to try new things.
How will I achieve this?
For piano practice at home in my spare time, maybe try to learn the song I’m working on right now (Fly me to the moon). Do my warm up every time I’m going to play. Work on my notes I can’t read yet (F and G).  Do exercises for my weakest finger (Pinky). 

For having a better attitude, try by talking to new people and working with new people so I’m more confident. After that I can try to ask more questions. Speak up more when teachers ask me questions. Try putting my hand up more when I know the answer. Try new activities.

Well being (spiritual, mental/emotional, social and physical) – students will be asked to rank 1-4 how they judge their well being overall and state why it is there. 
                                      1                      2                        3                       4

I ranked my wellbeing here because……

 I gave my self a 3 because I’m kind of average for social. But that is mostly when I’m with my friends. Physically I’m not a sporty person nor am I into trying new activities. My mental well being goes up and down quite a lot. Spiritually is average as well, I do like to listen to some music and play piano. However, nature is not my happy place.